 - TaskUP")
Realizar a transferência de dados do Notion para o ClickUp pode trazer várias vantagens, especialmente se sua equipe ou você está buscando uma solução mais robusta para gerenciamento de projetos e tarefas. Abaixo estão algumas das principais vantagens desse processo:
Vantagens de Transferir Dados do Notion para o ClickUp
- Centralização de Recursos:
- ClickUp oferece um conjunto de ferramentas integradas, permitindo que equipes gerenciem tarefas, documentos, comunicações e relatórios em um único lugar. Isso pode eliminar a necessidade de múltiplas ferramentas e simplificar o fluxo de trabalho.
- Funcionalidades Avançadas de Gerenciamento de Projetos:
- O ClickUp possui funcionalidades avançadas de gerenciamento de projetos, como dependências de tarefas, automações, e gráficos de Gantt, que podem não estar disponíveis no Notion.
- Customização e Flexibilidade:
- ClickUp permite maior customização com vistas personalizadas, campos customizados, e opções de automação que podem ser adaptadas às necessidades específicas da equipe ou projeto.
- Escalabilidade:
- Se você está planejando expandir sua equipe ou projeto, o ClickUp é projetado para escalar conforme suas necessidades, oferecendo mais recursos e suporte para equipes maiores.
- Colaboração Aprimorada:
- ClickUp oferece ferramentas de colaboração em tempo real, incluindo comentários em tarefas, menções de equipe, e chat integrado, melhorando a comunicação entre os membros da equipe.
- Integração com Outras Ferramentas:
- ClickUp possui integrações com uma ampla gama de ferramentas e serviços, incluindo Slack, Google Drive, e Zapier, permitindo uma integração perfeita no ecossistema de ferramentas já existentes.
- Relatórios e Análises Detalhadas:
- ClickUp oferece funcionalidades avançadas de relatórios que ajudam a monitorar o progresso do projeto, identificar gargalos e otimizar processos.
- Facilidade de Uso e Interface Intuitiva:
- A interface do ClickUp é desenhada para ser intuitiva e fácil de usar, facilitando a adoção pela equipe e reduzindo o tempo de treinamento necessário.
Passo a passo para realizar a transferência dos dados do seu Notion para seu ClickUp:
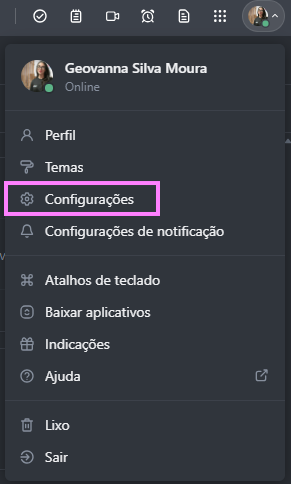
Passo 1: No seu perfil, clicar em configurações
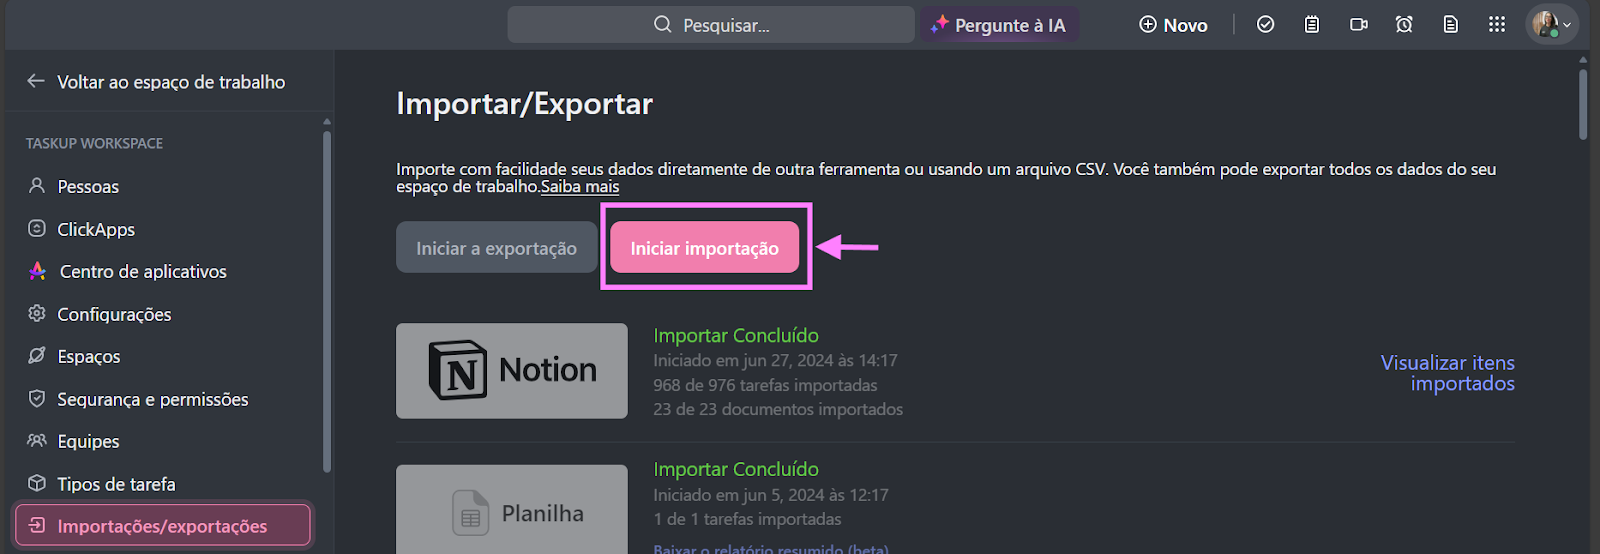
Passo 2: Na aba a esquerda do seu perfil, clicar em “importações/exportações”

Passo 3: Clique em “iniciar importação”
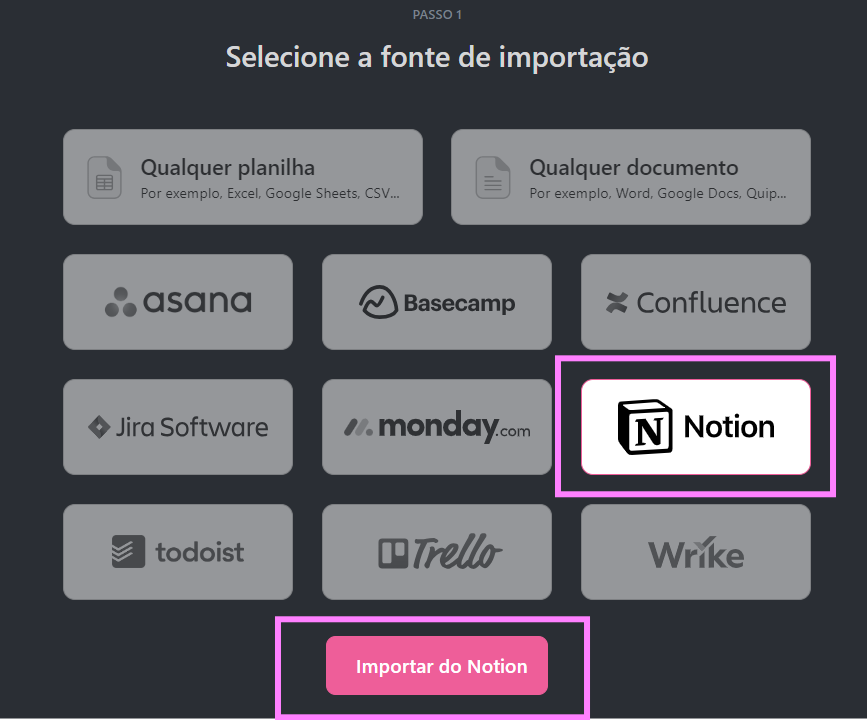
Passo 4: Selecione a opção da sua importação
No nosso caso será o “Notion” e em seguida em “Importar do Notion”
Passo 5: Abrirá essa tela e basta segui o passo a passo dela, que mostro a seguir:
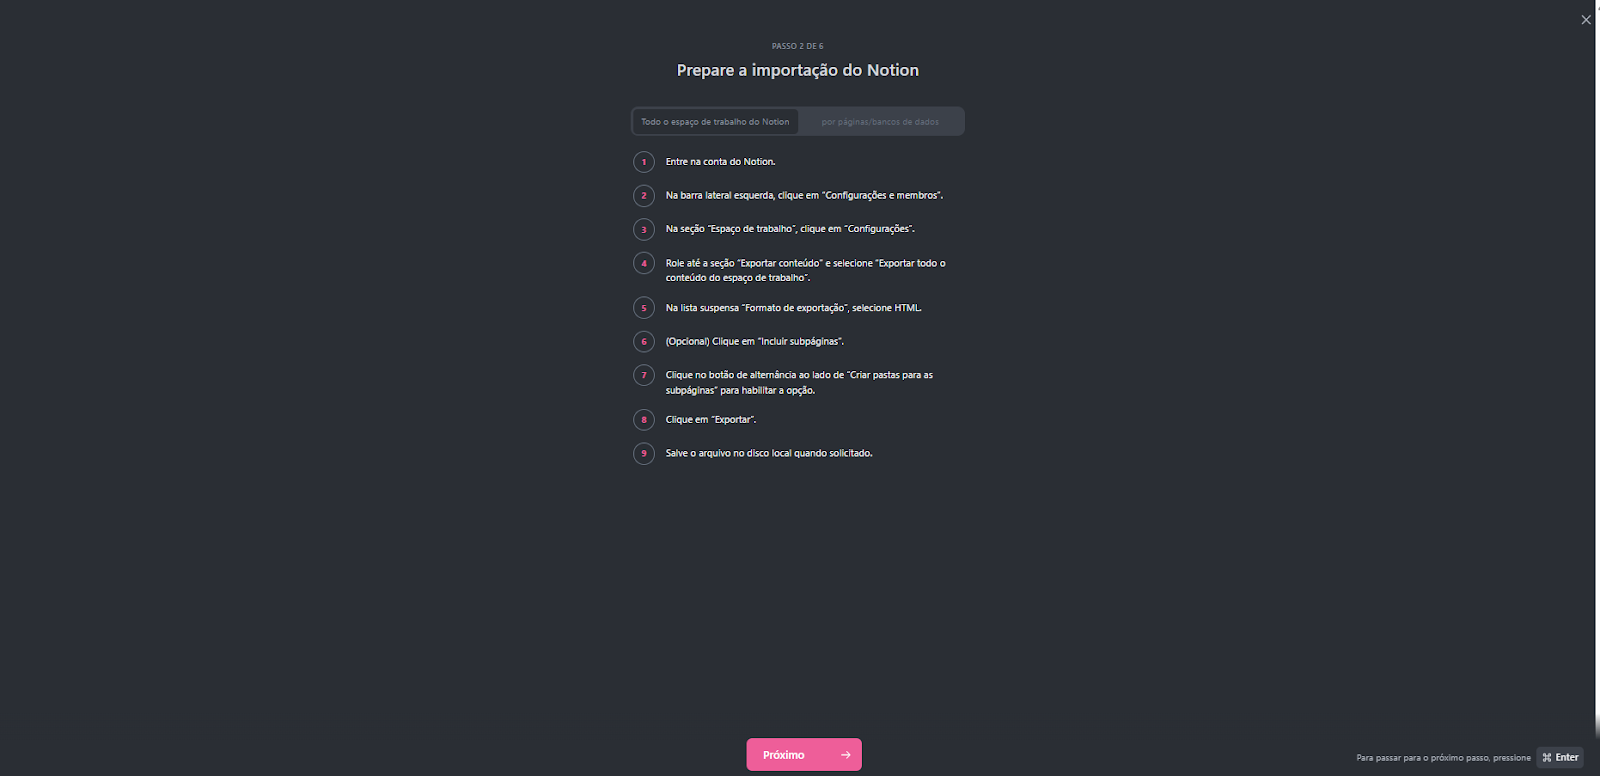
Agora o processo será dentro do Notion
- Entre na sua conta do Notion


- Agora já conectado no seu Notion, vá na barra lateral esquerda e clique em “configurações e membros”

- Na seção “Espaço de trabalho”, clique em “Configurações”.

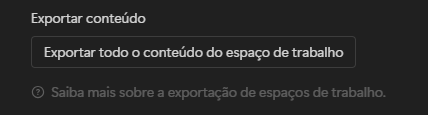
- Role até a seção “Exportar conteúdo” e selecione “Exportar todo o conteúdo do espaço de trabalho”.
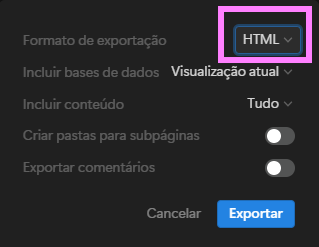
- Na lista suspensa “Formato de exportação”, selecione HTML.
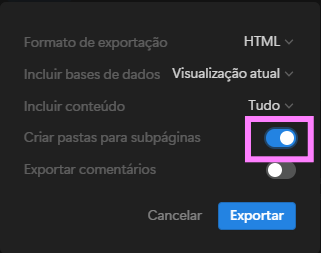
- (Opcional) Clique em “Incluir subpáginas”: Clique no botão de alternância ao lado de “Criar pastas para as subpáginas” para habilitar a opção.
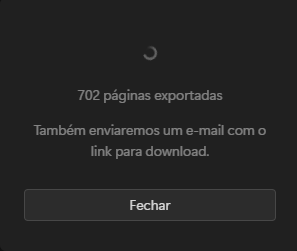
- Clique em “Exportar”.
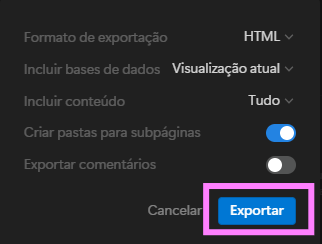

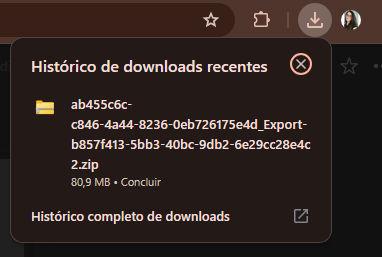
Obs.: O download demora um pouco dependendo do tamanho do seu Notion
De volta ao ClickUp:
Passo 6: Após a conclusão do download, clique em “Próximo” no ClickUp

Passo 7: Clique em “Busque no seu navegador” ou arraste o download
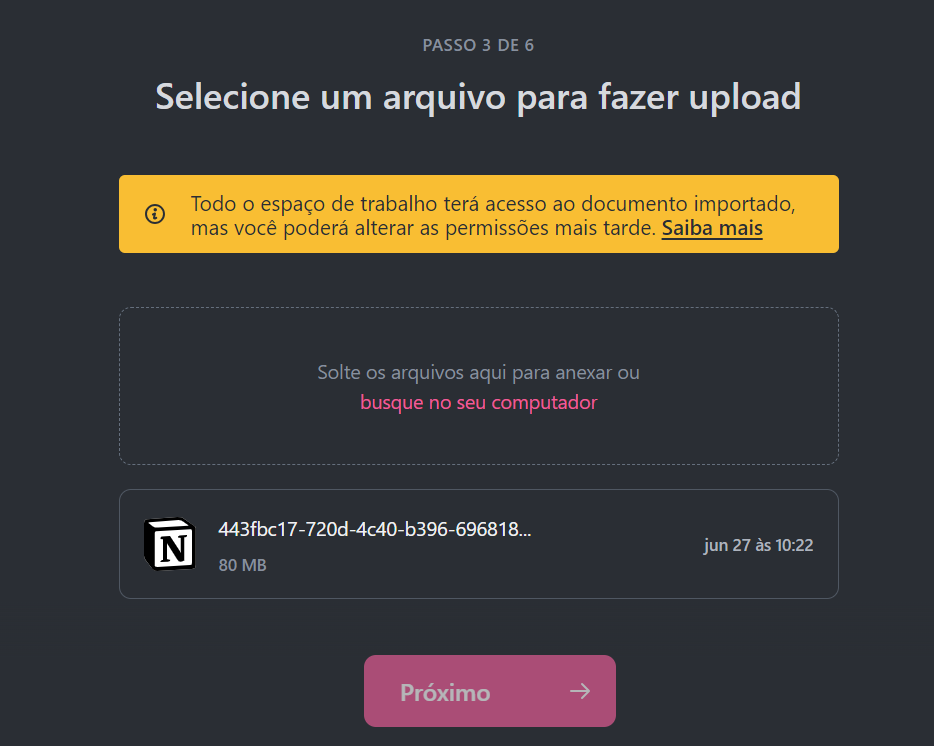
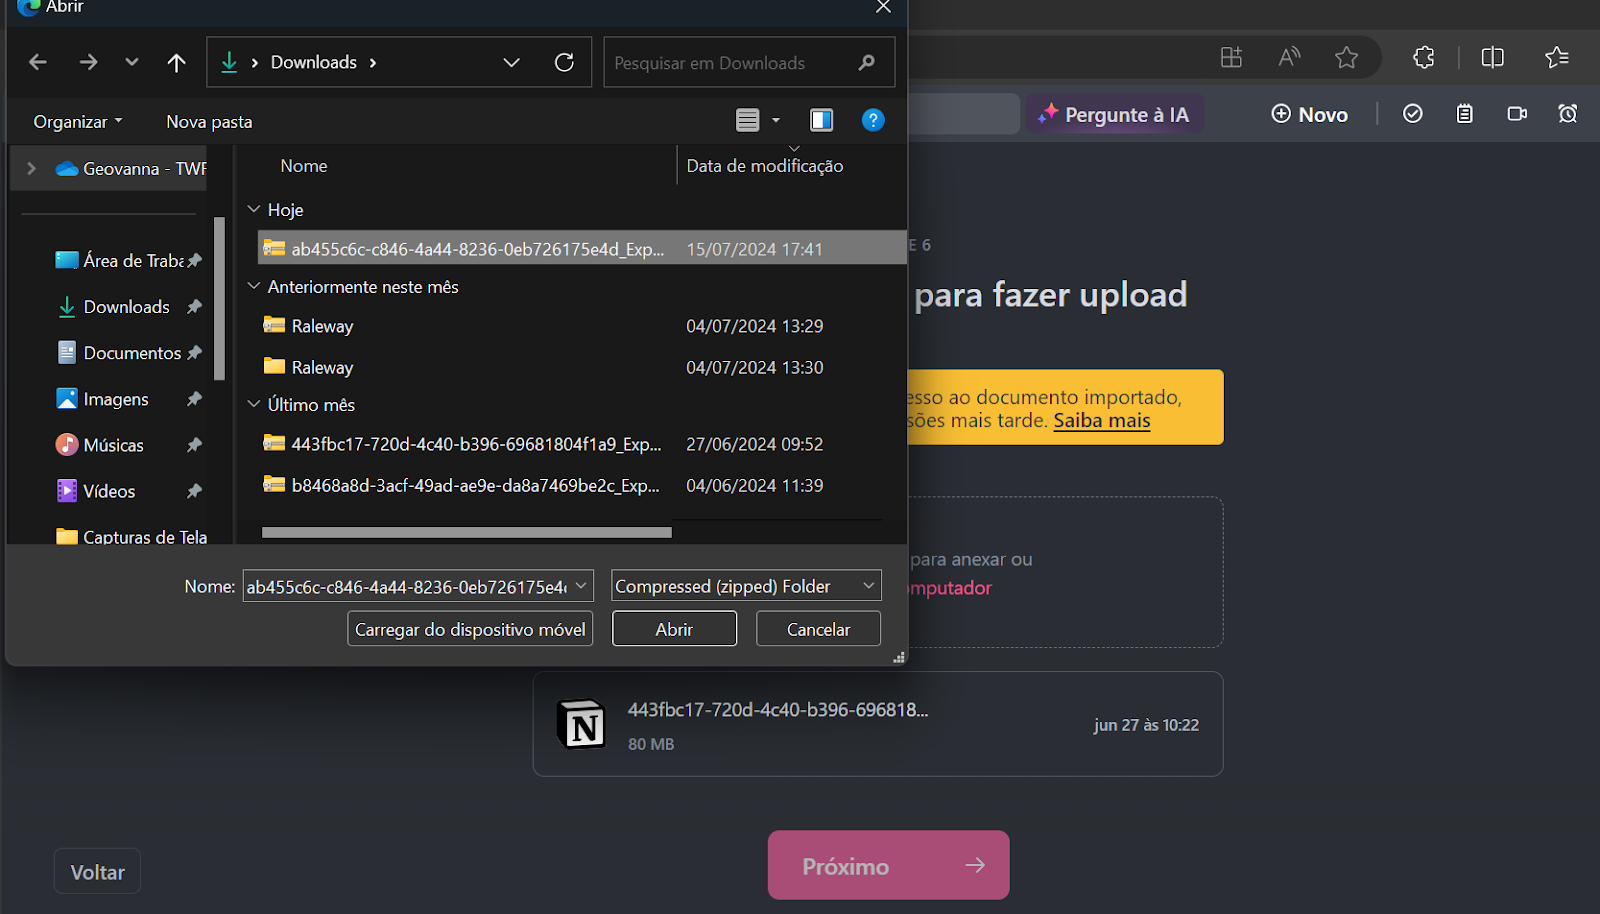
Passo 8: Espere fazer o download do seu documento para dentro do ClickUp

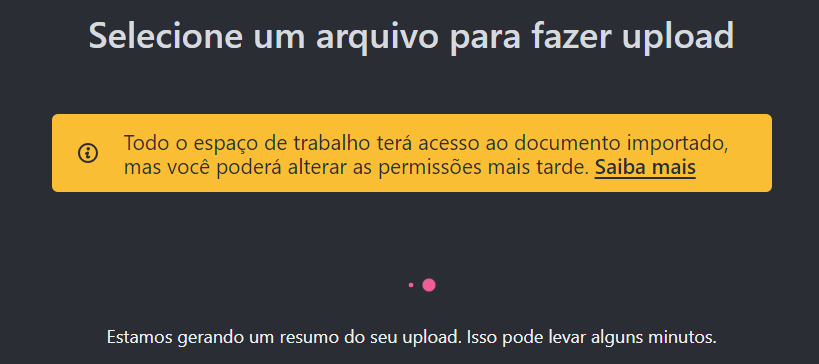
Passo 9: Finalizado o carregamento e, clique em “Próximo”

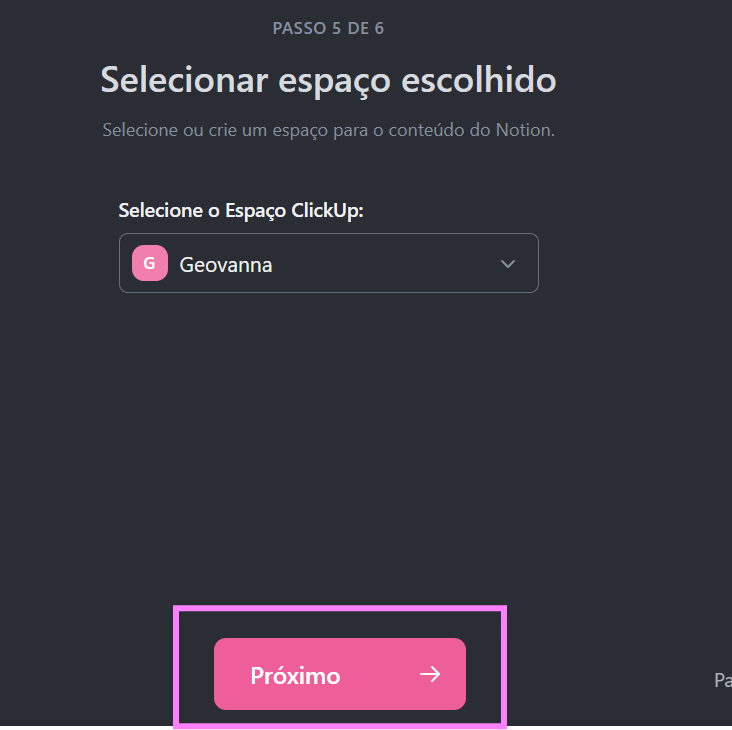
Passo 10: Selecione onde quer deixar sua importação dentro do seu clickUp,
é possível você criar um novo espaço ou colocar dentro de um espaço existente
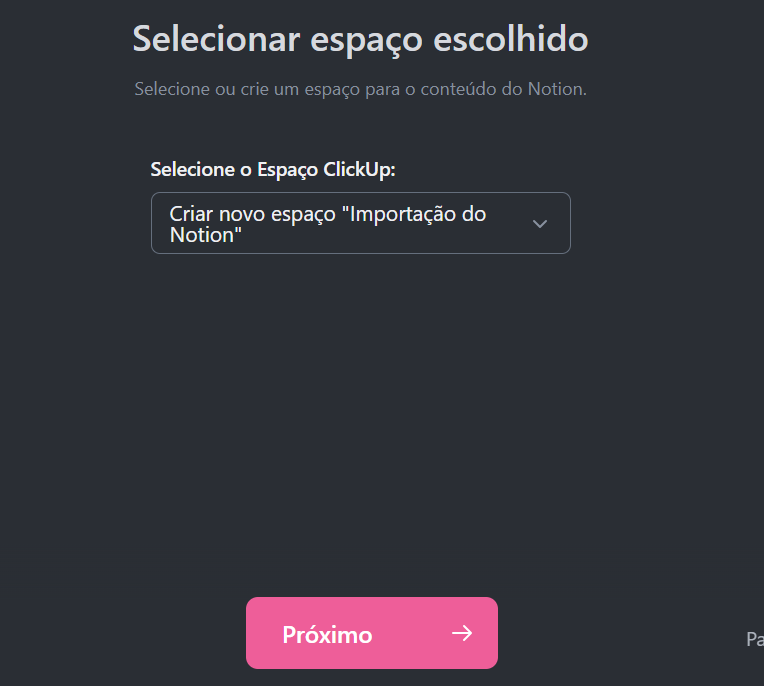
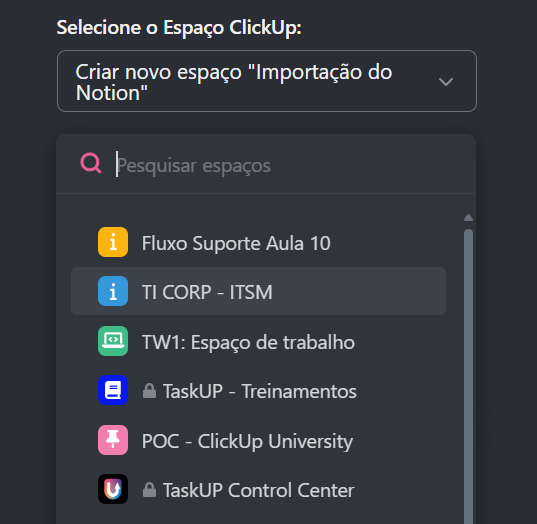
Passo 11: Após escolher o espaço que você deixara sua importação, clique em “Próximo”
Passo 12: Você pode importar seus usuários do Notion para o ClickUp, caso eles possuam conta ClickUp
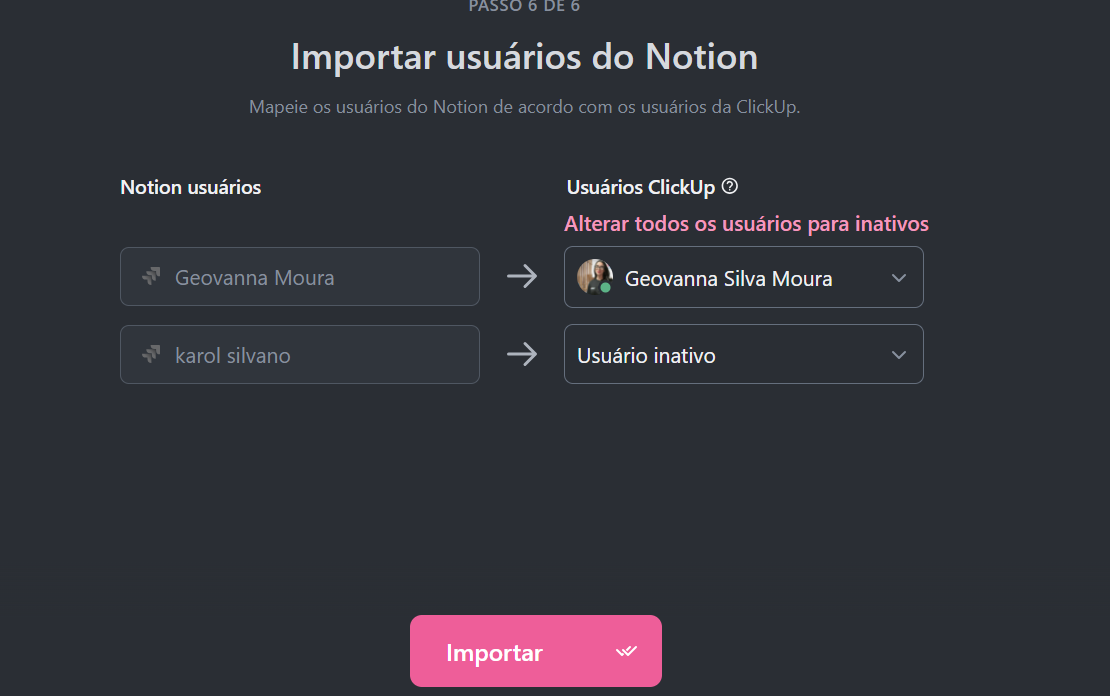
Finalizado as escolhas de usuário, basta clicar em “Importar”
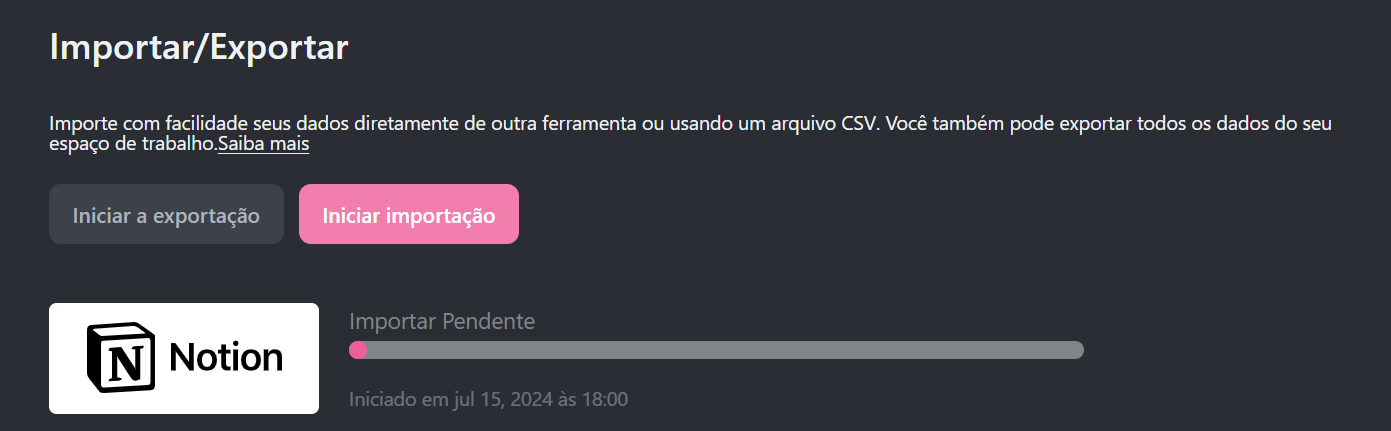
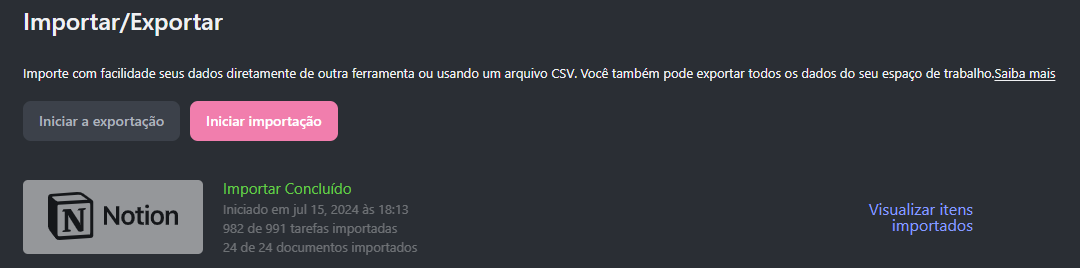
Passo 13: Iniciará a transferência para dentro do seu ClickUp
finalizado você poderá acessar todos os seus dados que estavam dentro do notion no espaço que você escolheu no ClickUp
Passo 14: Finalizando e Organizando
Agora você e sua equipe podem organizar as informações do melhor jeito ClickUp, podendo criar mais pastas e colocar as listas criadas automaticamente dentro dela e assim por diante ou usando em formato de Docs (O principal do Notion).
Segue o exemplo de como ficou a minha importação e como organizei para o meu clickUp, lembrando que cada um tem sua forma de organizar!
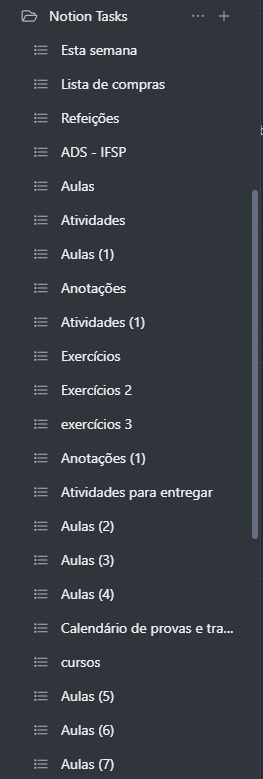
A importação criou essas duas visualizações, a primeira uma pasta “Notion Tasks” com as listas dentro e a segunda em formato de Docs (A principal do Notion) como “Imported from notion”:
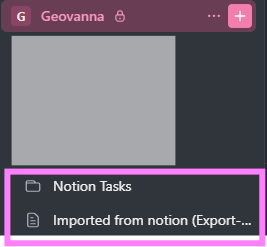
Clicando em “Notion Tasks” a importação deixou meus itens do Notion todos dentro dessa pasta em formato de listas:
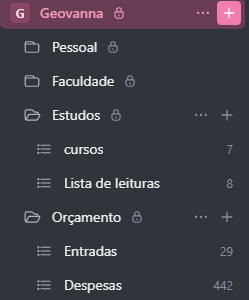
Então eu reorganizei em pastas e listas e ficou assim:
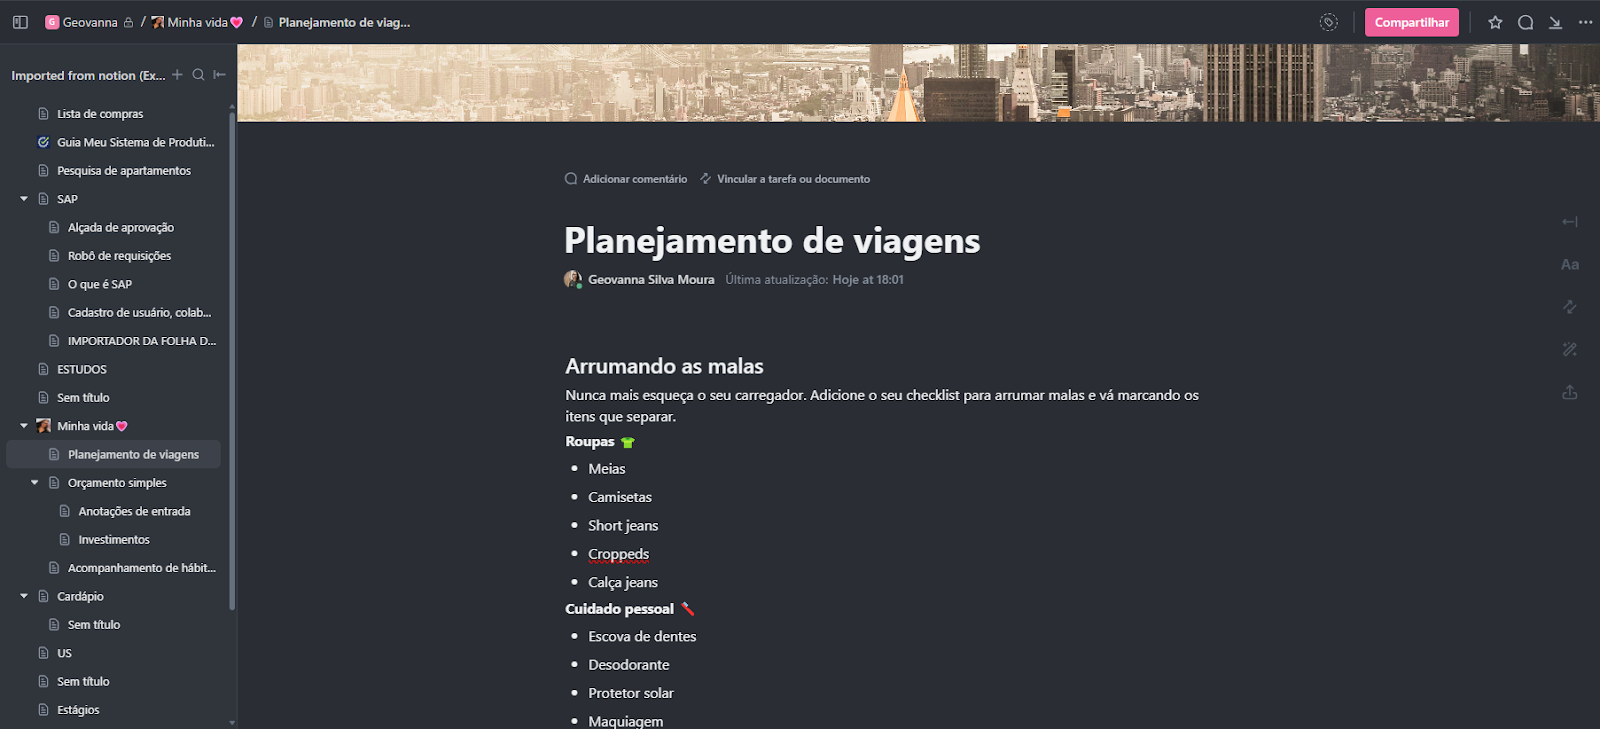
E a visualização em Docs da importação fica assim:

Basta reorganizar do seu jeito e o melhor para você!

Esse artigo foi útil? Quer aprender mais sobre o ClickUp agora? Podemos te ajudar!
ULTIMOS VÍDEOS
Descubra qual é a melhor licença para você e seu time
Aproveite para conferir outros conteúdos sobre ClickUp
Como Criar um Checklist de Produção de Conteúdo
Checklists não são apenas para gerentes de projeto. Para quem trabalha com marketing, produzir conteúdos [...]
jul
Integrar Salesforce com ClickUp – Demonstração
Integrar Salesforce com ClickUp – Demonstração: Se você está procurando uma maneira de otimizar suas [...]
ago
ClickUp 3.49 : Campos de IA aprimorados, o importador do Slack e muito mais.
Nesta semana, trazemos novidades como os Campos de IA aprimorados, o importador do Slack e [...]
mar
Listas na ClickUp: Entendendo as Diferenças entre Listas e Espaços na ClickUp
A ClickUp é uma plataforma de gerenciamento de projetos e tarefas amplamente utilizada por equipes [...]
maio
Gestão de Projetos no Meio do Ano: Como o ClickUp Pode Impulsionar Seus Resultados
O meio do ano é um momento estratégico para quem trabalha com gestão de projetos. [...]
jul
Novidades e Melhorias na Versão 3.48 do ClickUp
Na atualização desta semana do ClickUp, trazemos aprovações de folhas de ponto, a capacidade de [...]
mar
10 geradores de texto AI gratuitos para escrever em 2023
O bloqueio do escritor pode acontecer com qualquer pessoa e, às vezes, você precisa de [...]
jul
4 modelos de Templates prontos para projetos colaborativos na ClickUp
eduardosalerno See Full Bio
jul